fbpx
Back

Please enter your username or email address.
You will receive a link to create a new password via email.

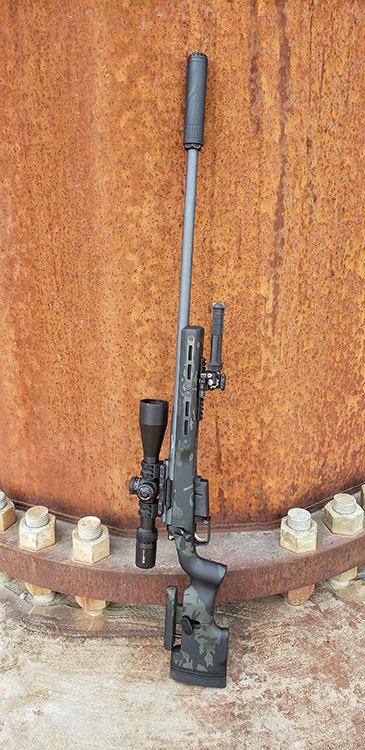
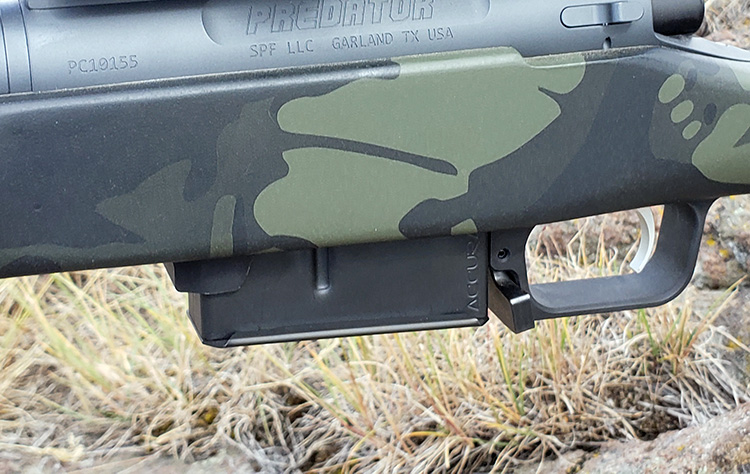
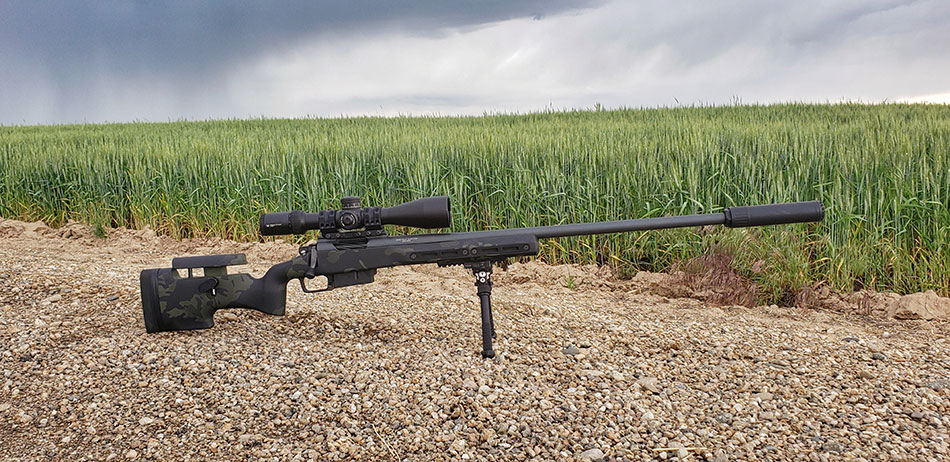
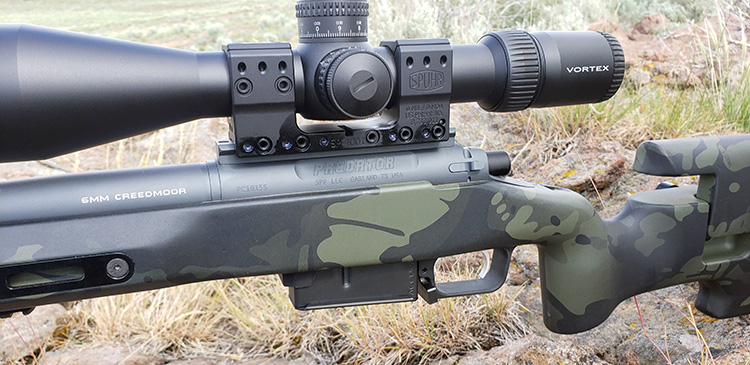
How Accurate Is Factory Ammo when Paired with a Custom 6mm Creedmoor Rifle Part I: The Rifle Build

In this part of a three-part series, we are going to talk about the rifle we are building for the test.

Hand-loaders are constantly searching for that one magical combination of brass, powder, and bullet that best suits their factory rifle. There are several issues with assuming that a particular load combination will work the same way across similar rifles, even if they come from the same manufacturer. 

First, rifles that come from a production facility are just that: production rifles. Now, I am definitely not stating that a production rifle will not shoot well. I am stating that no two rifles are identical. Just because your Remington 700 in .270 Winchester prefers a certain load is no guarantee it will perform as well as mine using an identical load.

The second issue with this thinking is that there are a large number of shooters who are not hand-loaders. These shooters with factory rifles are limited to available factory ammunition. Because of the looser tolerances in factory rifles, especially when compared to a custom rifle, the combination of factory loads and factory rifles does not always produce precise results.

What if you started with a custom rifle build and tested all available factory ammunition? How accurate would the results be?  Would they be adequate for the intended use? These are the questions we will be answering in this project. 

The Caliber

First I had to decide what caliber will be used for this build. As I am first and foremost a varmint hunter, heavier slower velocity calibers are not as appealing as faster, smaller diameter calibers. I decided that the largest diameter I would consider is 6.5 mm [.2644 inch] and there needed to be enough factory ammunition in current production to have a large enough sample size.

This eliminated wildcat cartridges and some up-and-coming cartridges like the .22 Creedmoor. In the end, it was determined the 6mm Creedmoor was the most appealing cartridge for this test (see dimensions in the photo – courtesy of Sierra Bullets). The 6mm Creedmoor will push an 87 gr Hornady V-Max around 3315 fps and a 108 gr Hornady ELD around 3030 fps, based on my testing. This results in a drop of roughly 1.6 inches and 2.1 inches at 200 yards respectively, based on the shooting conditions. 

The Rifle Action

The next step was to determine the components for the build. The heart of any good rifle begins with the action. The Stiller Predator short action with a .308 bolt face was a clear choice. This action was generously supplied by Stiller Actions of Garland Texas.  This action is machined from 416R stainless steel and is a Remington 700-style footprint.

The Predator actions are offered in long and short action with a variety of bolt faces. It has an extended magazine well for the hand-loader who likes to seat bullets longer than factory ammo. It uses the most dependable extractor available today and has an enlarged primary extraction camming surface. The bolt is one piece and hand-lapped to the action and fluted for better in field function. The firing pin is fluted for faster lock time and is fully supported within the bolt body. Finally, the bolt handle is threaded for the bolt knob. 

The Barrel

The barrel I selected is a stainless steel Rock Creek, 8 Twist, Sendero Contour. This barrel is a 5R, single-point cut precision rifle barrel. Rock Creek Barrels are manufactured on twin-spindle hydraulic Pratt & Whitney rifling machines. The barrel was then hand-lapped to a superb interior finish with proprietary compounds.

The Trigger

The trigger I went with was a Bix’n Andy Dakota Trigger. Bix’n Andy manufactures some of the finest triggers on the market. They are crisp with a consistent pull every time. The pull weight is adjustable from 1.0 pounds to 4.5 pounds; for hunting purposes, I kept this one at 2.5lbs.

These triggers are fully weather resistant with a seamless design. They also fit Remington 700-style actions with safety. They also boast patented ball bearing designs with precision machined parts with a retail price under $200. Our Dakota trigger was generously provided by Bullet Central

The Rifle Stock

The final core component of the rifle was the stock. This is where Grayboe stepped up to the plate and provided a beautiful stock for this build. The Grayboe Ridgeback stock paired with their Remington 700 Bottom Metal was the clear choice for this rifle. Feature for feature, it is one of the best buys in rifle stocks available. It features an adjustable comb and comfortable buttpad with an adjustable length of pull using the supplied spacers. The aluminum pillars are bedded with an integrated bubble level. The Ridgeback includes an integrated M-Lok system and has a cavity for additional weight if desired. The forend is wide, which was perfect for my hand. The forend is also flat in case you would wish to use a front rest. There is an integrated QD cup on the rear of the stock, and with the ample M-Lok room available, an external QD cup could be installed easily. The bottom metal accepts AICS style magazines. 

For the rifle graphics, I let Steve at Applied Hydrographics have complete creative freedom, and I was not disappointed. The amazing Black Multi-Cam pattern looks fantastic with the sniper Grey Cerakote applied by Vestals’s. 

The Magazine

I chose Accurate Mag for our AICS style magazines. These are simply one of the best magazines available. Past experience has proven these to be durable, with consistent feeding. At ShotShow 2020 Accurate Mag announced an aluminum version of their magazines but they were not quite ready for release. We hope to bring you more information about these in the future. 

Our Gunsmith

For the rifle assembly, I required an experienced gunsmith with a proven track record when it comes to competition, hunting, and extreme long-range accuracy. My guy was Robert Vestal of Vestal’s Gunsmithing in Bristol, VA. Robert took great care to the chamber, assemble, Cerakote, bed, and thread the barrel of this rifle. 

Scope Mount

I was looking for durability and accuracy in this rifle and, when it comes to scope mounting, my first choice was the Spuhr ISMS mounting system. The Spuhr SP-4001 is a 34mm mount machined from one piece of material for perfect concentricity. It features an integrated leveling system to perfectly level your optic parallel to the picatinny rail by indexing from the base of the turret housing. It also features an integrated bubble level, and the turrets are easily visible because of right angles in the mount on the elevation and windage sides of the optic. The rings are cut at 45-degree angles and feature ridges where scope rosin can be applied. Lastly, if you are seeking a customizable scope mount where you can add accessories, like an RMR or laser range finder, the Spuhr offers integrated accessory holes. 

Bipods and Support

For the front support, I used two different bipod setups, one for accuracy testing and one for hunting. I wanted these setups for a couple of reasons, including mobility, ease of deployment, and weight. For accuracy, testing stability was the name of the game. To help achieve the most stable platform possible, I paired the Accuracy Solutions Bipod XT with the Accu-Tac HD50. The Bipod XT is a bipod extension that moves the resting point of the rifle forward reducing unintentional movement. This assists with recoil mitigation, faster target re-acquisition, and helps reduce unintentional movement in the rifle system. The system comes with a complete assortment of rails and attachment options. The extension has a large QD level mount system and is well built.

The Accu-Tac HD50 is a heavy-duty bipod that was designed for .50 caliber rifles. It is easily adjustable from 7-10 inches through nine different settings. The spring-loaded legs easily retract with the push of a single button. The stance will range from 13.5-14.5 inches wide at the base. It also features an adjustable cant with heavy locking lugs. It is stout!

For a mobile front rest, I utilized the B&T Industries Atlas Bipod BT46-LW17. These bipods have a huge following in a number of shooting disciplines. I am continually impressed with their innovation and commitment to quality. The model I used in the hunt test features an American Defence quick disconnect lever, 30 degrees of possible travel (- 15° + or – of cant or pan), and non-rotating legs. The height can be adjusted from about 5-9 inches over four stop positions. The stance will range from 8-11 inches wide at the base. This bipod weighs in at 10.5 ounces. 

Optics

For optics, I chose the Vortex Strike Eagle 5-25×56 FFP MRAD. This scope has a 34mm tube with 31 MILS of elevation adjustment and 23 MILS of windage. The parallax is adjustable down to 15 yards, which is great for some close-range ground squirrels. This scope was crystal clear with plenty of magnification to spot impacts on the target at 100 yards.

Suppressor

The last component I used on the rifle is the OSS Suppressors Helix HX-QD 762 suppressor. This suppressor is amazing and was provided by the OSS staff. I had the opportunity to test this at Shot Show 2020 and was blown away. The Helix is built with patented Flow-Through technology, and it delivers 136-139 dB performance, is full-auto rated up to 5.56, and is cross-platform compatible up to .300 WM. The included QD brake worked effectively as a stand-alone unit with a clear dissipation of muzzle blast when compared to having no brake. The brake has left-hand threads for the compatible threads within the suppressor. The suppressor was clearly marked for the proper direction to tighten and remove the can.

Once the build was complete, we moved on to Step Two, which was shooting a wide variety of factory ammunition at the range. Stay tuned for the results.

Loading more posts ...